Making updates from your workstation with VSCode
- About this guide
- Overview of local development with git
- Walkthrough of the local development process
- Step 1: Forking the upstream repository
- Step 2: Cloning your forked repository
- Step 3: Configure the downloaded repository
- Step 4: Create a new branch to store your proposed changes
- Step 5: Make and commit desired changes to the new branch
- Step 6: Push your new branch to your fork on github.com
- Step 7: Create pull request to submit your proposed changes
About this guide
While GitHub’s browser based tools work great to do many file and document management tasks in a repository, there are many types of tasks that benefit from using local editing tools.
This guide will walk through the process of creating a local copy of a repository, using Visual Studio Code to edit content, and the posting your updates back to the source repository.
Pre-Requisites
You should be familiar with standard git operations using GitHubs browser-based editing tools, such as making pull requests to post new files and modify existing files.
We recommend you complete the ModernApps Skills 101 course prior before proceeding through this guide.
While its not strictly necessary, additional training in entry-level git is very helpful, and the free Introduction to GitHub Course, the First Day on GitHub and other free courses from GitHub labs are truly excellent learning resources that we highly recommend.
- You will need the following applications installed and setup on your workstation to complete this lab, the latest versions of each should work fine:
Please Note: Ubuntu Desktop and the Bash shell were used to create the instructions and examples in this document. While each step in this document can be done in nearly all desktop operating systems, the instructions are only provided for Ubuntu and readers may need to adapt the instructions as needed for their preferred environment.
Overview of local development with git
As noted in the pre-requisites, you should be familiar with basic editing of files using GitHub’s browser-based tools before continuing with this guide.
When you make an edit to a file on a repository using GitHub’s browser based tools, for example if you enrolled or took a test for the ModernApps Skills 101 course, you have already gone through essentially the same process in the browser that you will need to do from a local shell command prompt when editing a cloned repository from your workstation.
Here is a review of the high-level process:
Click to expand an infographic of the process from the Kubernetes contributors guide
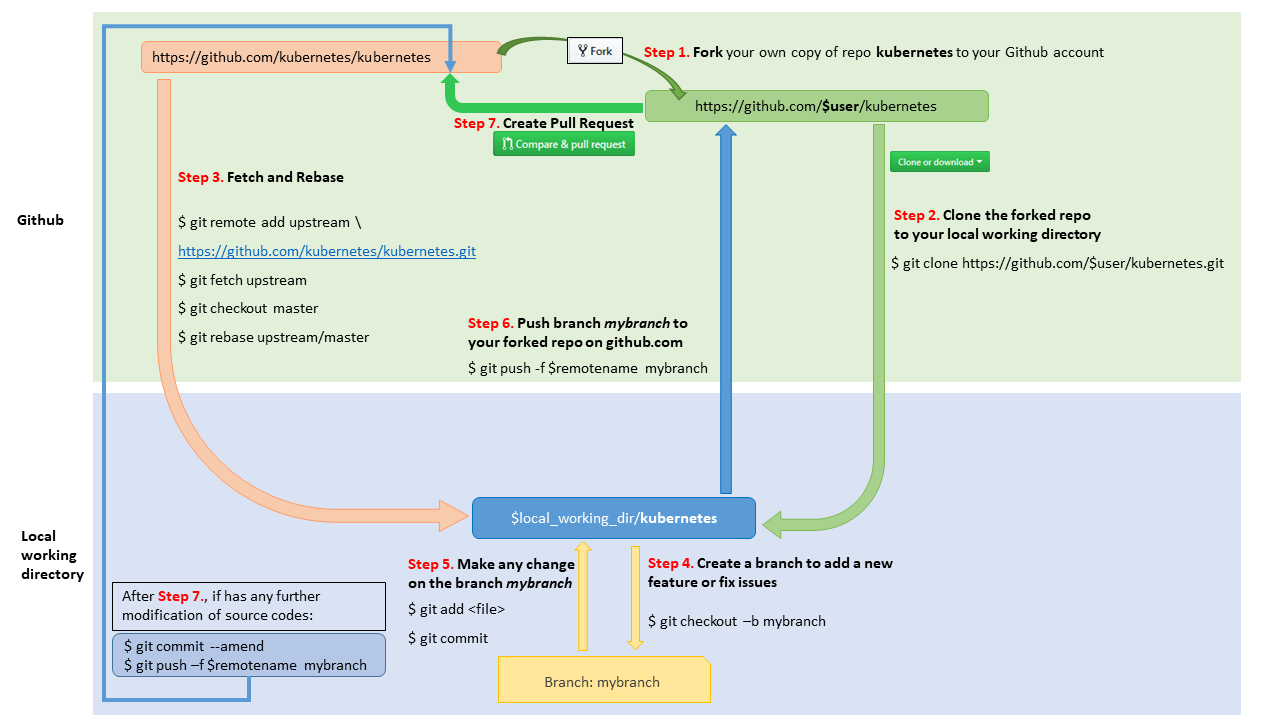
- Step 1: Fork your own copy of the repository you want to modify
- A fork is a special copy of a repository hosted on your own github account, where you can make and store edits that you can then submit to the source (upstream) repository
- Step 2: Download a copy of your fork
- Working with a fork is much like working with any other GitHub repository, and you can clone (download) it in the same manner you would any other repository
- Step 3: Connect the local copy of your fork to the upstream source
- When you download (clone) a copy of your fork from GitHub and do commands like
git pullorgit push, it is set to pull and push updates to and from your fork on GitHub. The source repository that your fork is copied from is known as the “upstream” repository and you will need to specify the upstream repository to fetch or pull updates to keep your local copy in sync.
- When you download (clone) a copy of your fork from GitHub and do commands like
- Step 4: Create a branch to hold your proposed changes
- Creating a branch keeps the changes you make seperate from other files in the repository, which enables a reviewer to see exactly the changes you are proposing when they review your request. If the changes you submit are approved, your branch will be merged into the upstream branch and the changes you proposed will be live, at which point the branch can be deleted.
- Step 5: Make and commit any changes needed
- You should always make smaller changes and submit your updates to GitHub frequently, which helps to prevent merge conflicts that occur when different people make updates without having the latest version of the file.
- Step 6: Push the new branch you created for your updates to your forked repo on GitHub.
- Pushing your updates to your fork on GitHub provides a place to store your recommended edits for them to be reviewed before they are merged.
- Step 7: Create Pull Request
- Using the GitHub website, you can easily submit a pull request to the upstream repository setting the new branch you created for your updates as the source and the upstream repository as the destination.
Walkthrough of the local development process
This exercise is designed for you to follow along and execute each step as instructed below to allow you to go through the entire process in this learning environment before you need to work on an actual production change.
Step 1: Forking the upstream repository
- Action:
- Open a browser to https://github.com and login
- Navigate to the ModernApps Learning Docs site at https://github.com/ModernAppsNinja/docs_pd6204
- On the upper right hand corner of the browser, click the
Forkbutton
Click to expand screenshot for this action

- Action: If prompted, select the account or organization you would like your fork located. Select your Github account name.
- Note: You may not be prompted if you are only an admin/owner of a single account or organization, if you are not prompted to select a repository, you can skip this item and proceed to the next substep below.
Click to expand screenshot for this action

- Action: Your browser should automatically direct you to the GitHub webpage for your forked copy of the ModernAppsNinja/docs_pd6204 repository.
Click to expand screenshot for this action

- Action: Expand the screenshot image above of the example github homepage for your forked repository and review the highlighted items:
- Item 1 displays the name of your account and repository, and shows which upstream repository your forked repository was created from.
- Item 2 displays the branch you are currently viewing.
- Item 3 provides a message that displays if your repository is in sync with the upstream repo, and will indicate if there are differences between your fork and the upstream repo.
- Item 4 - the
Contributepulldown provides a simple way to open a pull request if your repository has differences from the upstream repo. - Item 5 - the
Fetch Upstreampulldown allows you to manually trigger a check to determine if there are differences between your fork and the upstream repo
Step 2: Cloning your forked repository
Important: To clone your forked repository, you will need to execute CLI commands from Bash or another command shell on your workstation. When you clone your repository, it will download the repository files into a folder in the directory that you execute the clone command from. Before you clone your forked repository, be sure to create and navigate to a directory on your workstation where you would like to download it. You can create or use any standard directory on your workstation to save your downloaded repository.
- Action:
- Open a web browser to the GitHub webpage for your fork
- Click the
Clonebutton and observe that 3 options are provided:Https,SSH, andGitHub CLI- The
HTTPSoption provides the URL you can use to clone the repository using the HTTPS protocol. - The
SSHoption provides the SSH address you can use to clone the repository using the protocol.- for both the
HTTPSandSSHoptions github only provides the address for the repository and not the full command you would need to execute the clone operation. If you select one of these options you will need to enter the commandgit clonefollowed by the HTTPS URL or SSH address from Bash (or other command shell) on your workstation.
- for both the
- The
GitHub CLIoption provides the entire command to clone the repository so you can simply copy and paste this command in your shell. This option requires that you have the GitHub CLI installed and configured on your workstation.
- The
Click to expand screenshot for this action

Note: While you can use any of these 3 options to clone your forked repo, this example will use GitHub CLI to execute the clone operation.
- Action: Copy the
GitHub CLIcommand, paste it in your bash prompt and press enter. This will create a new folder with the name and content of the repository you cloned, in this example the name of the folder is docs_pd6204. In your command prompt, navigate to the new directory.
Click to expand screenshot for this action

You have completed cloning your forked repository, please proceed to the next step.
Step 3: Configure the downloaded repository
In some versions of the git client, when you clone a forked repository, your local git client may not be aware that it is a fork, and may need to be configured to be able to connect to the upstream repository.
In this step you will review your git config and if needed update your git config file with the address of the upstream repository. Next you will fetch any updates from the upstream repo to ensure your local git client has the latest updates, and then rebase your local fork to use the upstream repo.
- Action: From your shell command prompt, ensure your prompt is set to the directory for your forked repository and enter the command
cat .git/configto display your git config file. Ensure your git config file has a section forremote "upstream"set to the https or ssh address for the upstream repo, as shown in the image below.
Click to expand screenshot for this action

If your git config file did not have an upstream repo click here to see instructions to configure it
- Action:
- In a web browser navigate to the github webpage for the upstream repository https://github.com/ModernAppsNinja/docs_pd6204
- Click the
Clonebutton, select theHTTPSoption and copy the URL for the repository

- Action: From your shell command prompt, ensure your prompt is set to the directory for your forked repository and enter the following command to update your git config with the address of the upstream repository:
git remote add upstream https://github.com/ModernAppsNinja/docs_pd6204.git
Your git config file has now been configured to connect to the upstream respository
- Action: Enter the following commands to fetch the latest updates from the upstream repo and rebase your local fork to align with the upstream:
git fetch upstream
# the "git fetch upstream" command pulls down information about any new updates to the upstream repository, but it does not apply them to your locally downloaded copy of the repo
git checkout main
# the "git checkout main" command ensures your local environment is set to use the main branch
git rebase upstream/main
# the "git rebase upstream/main" command is a safer way to apply new updates fetched from the upstream repository to your ...
## locally downloaded fork.
Note The git rebase command works by taking any changes you have made in your local repository to a temporary area, then updates your local branch to be in sync with the upstream branch, and then applies any changes you made locally to the updated main branch in the order you made them. This helps to prevent merge conflicts, and in the case there is a merge conflict, it will notify you and allow you to fix the merge conflict locally before you submit your update to help ensure your update gets approved quickly with desired results. In the event you have any problems with the locally downloaded copy of your fork, you can delete and then redownload the fork by repeating step 2.
Click to expand screenshot for this action

You have completed configuring your forked repository, please proceed to the next step.
Step 4: Create a new branch to store your proposed changes
- Please note: Git branches can be used for different use cases. This document focuses on the most common use case for git branches, which is making a temporary branch you can use to submit edits and updates you make to files in a repository. Please keep in mind the best practices shared in this document are specific to this use case and may not be the same for different use cases.
When making edits and updates to a git repository, you always need to be careful to minimize the chances of a “merge conflict” which occurs when two people make edits to the same file at the same time and git is not sure how to combine the different edits into the desired final document. Occasional merge conflicts are normal in git repositories and are not difficult to resolve, but they do require manual intervention and can really slow down the agility of your project.
Fortunately, by following some basic best practices when you make updates, it greatly reduces the chances of running into merge conflicts to the point where conflicts can be pretty rare when managed well.
The main principle you should keep in mind when updating files on a repository is that you should try to make small changes and then commit and sync your updates with the upstream repository frequently. If you have several changes you need to make, its best to break them into several smaller changes to stay closely in sync with the repo.
Git provides several tools you can use to help ensure that git’s version control process works smoothly, including features like branches and commits. When you create a branch, git creates a logical space to keep files you modify seperate from files you have not modified in your fork of the repository.
Important: Your branch name does need to be unique in your fork, so it is important to check what branches exist before creating one, deleting old branches after they are merged or closed, and I also append a random or semi-random number to temporary branch as an extra precaution to make sure I dont accidentally reuse an old branch that may still be waiting to merge or forgot to delete. One other consideration is that while branches are local to your fork, there may be times where you are working on a common fork with other people, so it is a good habit to include your username or something unique to you.
- Action: From your shell command prompt, ensure your prompt is set to the directory for your forked repository and enter the following commands - be careful to replace “YOURGITHUBUSERNAME” with your gitub username:
# Enter the "git branch" command to review the names of current branches
git branch
# Enter the "git branch BRANCH_NAME" command to create a new branch
git branch YOURGITHUBUSERNAME_new_branch_1234
# Enter the "git branch" command to review the names of current branches and observe the new branch you created is listed
git branch
## Note that there is an asterisk next to the "main" branch, indicating your local environment is still set to use the main branch ...
### this is because the "git branch BRANCH_NAME" will by default create a new branch but not switch your local context to use it
# Enter the "git branch -d BRANCH_NAME" to delete the branch you just created
git branch -d YOURGITHUBUSERNAME_new_branch_1234
# Enter the "git branch" command to review the names of current branches and observe the new branch you created has been deleted
git branch
# Enter the command "git checkout -b BRANCH_NAME" which will both create a new branch and switch your local git clients context to use the new branch
git checkout -b YOURGITHUBUSERNAME_new_branch_4321
# Enter the "git branch" command to and observe the new branch has been created and your local client is set to use it
git branch
Click to expand screenshot for this action

Step 5: Make and commit desired changes to the new branch
Step 5A - Make desired updates
Before you make any changes to the local copy of your fork, you should always fetch and rebase to ensure your everything is up to date. Since you just did the fetch/rebase, you can now proceed to make updates to the local copy of your fork.
In this step you will create a new file so you can practice uploading and submitting an update to the upstream repository, but first update VSCode with a plugin that allows you to cut and paste images, as uploading images is one key action that is often easier to do from your local workstation than through the browser.
Using VSCode to cut and paste images
When you put an image in a markdown or html document, you include a link to the image in the document and the image file itself is saved either in some folder in the repository or online somewhere in an accessible location. So to put an image in a document is actually a 3 step process: 1) Upload the image somewhere. 2) Determine what the address will be of the image once its published. 3) Put the permanent link to the image in the document where you want it to display.
When you are working with or creating documents that have multiple images, it can be very cumbersome if you do not have a tool that helps making image uploads easier.
VSCode has multiple different extensions that can be used to enable cutting and pasting of images. These extensions generally work in one of 2 ways:
- Some cut/paste extensions work by uploading your file to an online image or file hosting service and then include a link to the url for the image in the document. This approach has the advantage that the location you paste the image to is always the same and does not need to be adjusted to save the file in a particular folder in a repo, which can be a different location on different repositories. The downside of this approach is users need to get an API key for the online image service they want to use, and then if a repository wants to keep all images in a common account, a mechanism needs to exist to share a common API key among users or setup RBAC to allow different users to share access.
- The main method that extensions use to cut/paste images is to paste the image in some folder in the repository where the document you want the image to appear in is located. This method has the advantage that the source image is easy to find and update if needed, and ensures the contents of the repository are free from external dependencies and there is no risk of an external image source being offline or removed. It also uses the same IAM and RBAC policies used for the repo itself. The downside of this method is that you will need to adjust the settings for the copy/paste extension for the repository you are editing, as different repositories often have different locations where images should be stored.
In this document and for all content posted to repositories in the ModernApps Learning GitHub organization, at the current time we strongly prefer using an extension that implements the second method as it ensures that all images are available within the repository and not associated with an individuals personal fileshare or other external services where we cannot assure ongoing availability of the content.
There are several extensions that use this second method, and it doesnt matter which of the available extensions you use so long as it saves the image file locally within the target repository. I will recommend and use a specific extension in these instructions, but I have found that different extensions work better with different operating systems, so if you have any problems with the image cut/paste extension used in these instructions, you can search the VSCode extension directory and try an alternative extension. Also note that the act of taking a screen capture may not work well out-of-the-box with many linux distributions, so I use the Shutter screenshot tool on Linux to take screen captures which is not required but may be useful if you have any challenges making screen captures.
- Action: Open VSCode and navigate to the
Extensionssidebar. In the search box enter “paste image to markdown” and then scroll through the results until you see “Paste Image to Markdown” from the developer “Liu-Yong”
Click to expand screenshot for this action

- Action: Click on the “Paste Image to Markdown” extension and select install. After it finishes installing, click the reload option if VSCode prompts you to reload, and then click on the settings gear icon for the extension.
Click to expand screenshot for this action
Note: The image below shows the option to uninstall the extension, because it is already installed in my environment. If the extension has not yet been installed in your environment, it will show you the option to install in the same place as the uninstall option in the image below.

- Action:
- After you click on extension settings, VSCode will bring you to the main settings menu, and you will need to navigate to the specific settings for the “Paste Image to Markdown” extension.
- On the settings menu, click the arrow next to
Extensionsto expand the list of extensions that are installed, and then click on the “Paste Image Configuration”
Click to expand screenshot for this action

Important: Different GitHub organizations and repositories have different standards for where images should be stored. The settings provided below will work for this example, however when you use the paste image extension to make updates outside of this example, it is important that you adjust the Path setting to save the image to the appropriate location for the repository you are updating, and update the Insert Pattern setting so that the image link pasted into the document accurately links to the location where the save image will be served. Within the ModernApps Learning GitHub Organization, we are working on having a consistent standard for how images are saved across all repositories, however this is still a work in progress, so it is important to look at the repo you want to update to determine where image files are stored for that repo.
- Action: Update the paste image settings to match the following values. Leave any values not listed here set to their defaults:
- Field Name:
Paste Image to Markdown: Base Path- Field Value: This field should be completely blank with no text.
- Explanation: By default this field populates variables intended to dynamically reflect an accurate path in the
Insert Patternfield, but I have had a difficult time getting it to work consistently so I leave it blank and instead insert a static path into theInsert Patternfield as shown below.
- Field Name:
Paste Image to Markdown: Insert Pattern- Important: In the following field value, replace the string “YOURLOWERCASEGITHUBUSERNAME” with your github username in all lower case letters
- Field Value:
${imageSyntaxPrefix}/docs_pd6204/docs/localdevelopment/guestbook/YOURLOWERCASEGITHUBUSERNAME/${imageFileName}${imageSyntaxSuffix} - Explanation: This field provides the pasted link in the document to where the image will be served, but does not define the location where the image will be saved. The imageSyntaxPrefix and suffix insert the required formatting to display images in markdown. The “/docs_pd6204/docs/localdevelopment/guestbook/” is the URL path to directory the image will be served from, and the imageFilename is a variable that will insert the dynamically generated name of the image file that gets created when you paste the image in the document. In the following steps in this example, you will be creating a document that will be saved as the only document in a folder, and the image will be saved within the same directory as the document. With this method where images are saved in the same folder as the document, you will need to update this setting every time you edit a different document to ensure the pasted image link accurately reflects where the image is stored. A key advantage of this method is that it keeps the images used in a document associated with that document, making the document portable and free from complicated dependencies such as dedicated image directories where it can be very difficult to tell which image is associated with which document.
- Field Name:
Paste Image to Markdown: Name Prefix- Field Value:
/
- Field Value:
- Field Name:
Paste Image to Markdown: Path- Field Value:
${currentFileDir} - Explanation: This field defines where the image will be saved in your local directory. When the
currentFileDirvariable is set as thePathvalue, the extension will save the image into the same directory as the document you are pasting the image into. If you need to save images in a different folder, update this field with the path to the folder where you want pasted images to be saved.
- Field Value:
- Field Name:
Create a document to upload to the guestbook directory
IMPORTANT: You can customize the text you put in this file, but be careful to only submit text or images that are business professional and do not include anything that is potentially offensive. The ModernApps Learning community embraces all people around the world regardless of their race, culture, gender identity, orientation or any other attribute. Be careful not to include any content that is derogatory or that may make anyone uncomfortable or you could be warned and possibly subject to removal from the community in extreme cases.
This example is designed to allow you to create and submit a file to allow you to walk through the entire local development process in a safe environment before you need to try using this method to update production assets.
- Action: From your shell command prompt, navigate to the following directory within your local copy of your fork:
/docs_pd6204/content/en/docs/localdevelopment/guestbook/- Create a file with vscode using the name of your github username in lower case letters and the
.mdextension with the commandcode YOURLOWERCASEGITHUBUSERNAME.md - Observe that VSCode opened the new file you created in the previous command in its editor window
- Create a file with vscode using the name of your github username in lower case letters and the
Click to expand screenshot for this action

- Action: Using the VSCode editor, paste the following text into the new file you created in the previous action and replace the string “YOURGITHUBUSERNAME with your GitHub username:
---
title: "YOURGITHUBUSERNAME"
---
Click to expand screenshot for this action

- Action:
- In VSCode, on the 4th line of the file type in “Hello World”
- Save your file, as it is required to save the file before the paste image extension will work
- Expand one of the images in this document or another appropriate image, right click it and select
copy image - Using the VSCode editor, place your cursor on the second line of the new file you created, and press the keyboard shortcut
ctrl + alt + vto paste the image to your repo using thePaste Image to Markdownextension. - Note: This will paste the link to where the image file will be served in the document, and save the image file to the directory you defined in the
Pathproperty of thePaste Image in Markdownextension settings.
Click to expand screenshot for this action

Click to expand screenshot for this action

Click to expand if your image did not paste correctly
If you did not see a link to the image get pasted in your document, or if you do not see the image file being saved to its target location in your directory, please review the following list for resolutions to common problems.
- Possible Issue: The keyboard shortcut used in this example might not work the same on your system
- Solution Place your mouse cursor at the location in the document where you want to paste the image link. Access the command palette for your VSCode environment, which by default can be opened with the keyboard shortcut
ctrl + shift + p. At the command palette prompt, typePaste Image to Markdown, which should bring up a command link that will paste them image when you click it. If there is an issue, a relevant error message may be displayed briefly in a popup window on the lower right hand corner of your monitor.
- Solution Place your mouse cursor at the location in the document where you want to paste the image link. Access the command palette for your VSCode environment, which by default can be opened with the keyboard shortcut
- Possible Issue: There is a problem with your workstations’ copy/paste/clipboard functions for images and/or there is no image on the clipboard
- Solution Confirm that you can copy and paste images successfully by opening an application that you know supports pasting images, such as a word processing app like libreoffice or another app you know supports standard pasting of images, and attempt to paste an image. If you are unable to paste an image in the other application, it indicates there is a problem with the ability to copy and paste images on your system and is not related to this guide. I would recommend you look for support directly related to your operating system and workstation, and once you are able to get standard copy/paste functionality for images working on your system, resume this lab.
- Possible Issue: The link to the image was pasted in the document, but you do not see the image file itself. It is possible the image file was saved in different directory than you were expecting and so you do not see it, caused by a misconfiguration of the
Paste Image to Markdown: Pathsetting.- Solution In the VSCode file browser, right click the local directory for your fork, select
Find in Folder, and search for the filename of the image you can find in the link that was pasted into the document. If you find the image in a different location than you expected, adjust thePaste Image to Markdown: Pathsetting until the issue is corrected.
- Solution In the VSCode file browser, right click the local directory for your fork, select
- Possible Issue: The image was saved as expected in your directory, but the link that was pasted in the document does not seem to match the location of the image
- Solution Proceed to the next section in this step where you can validate the image link by doing a local hugo build. Keep in mind that the location where the image is saved is not the same as the location where the image will be served from. The Hugo static site generator will copy the image to a different location to be served on the generated modernapps.ninja/GitHub Pages website for the repo, so the saved image path and the link to the image in the document should not match exactly. If there is a different problem with the pasted link to the image in the document, adjust the
Paste Image to Markdown: Insert Patternsetting until the issue is corrected.
- Solution Proceed to the next section in this step where you can validate the image link by doing a local hugo build. Keep in mind that the location where the image is saved is not the same as the location where the image will be served from. The Hugo static site generator will copy the image to a different location to be served on the generated modernapps.ninja/GitHub Pages website for the repo, so the saved image path and the link to the image in the document should not match exactly. If there is a different problem with the pasted link to the image in the document, adjust the
Validate your updates prior to committing
Most updates made to ModernApps Learning repositories are related to content that is created in markdown files which are used to automatically generate html files to present a standard webpage that is served by GitHub Pages in the https://modernapps.ninja domain. If your desired updates are to a repository that serves a webpage, you wont be able to tell how the webpage will appear until your submitted updates are approved and Hugo builds updated versions of the webpages. When updates are merged into ModernApps Learning repositories, and automated workflow triggers hugo to build and post updated webpages that reflect the changes you made. It is usually desirable for you to be able to confirm how your updates will appear when rendered in html before you commit and submit updates to GitHub.
If you have installed hugo in your local shell, it is very easy to have hugo serve the rendered webpages in a special development mode where every time you save changes to a file, hugo automatically generates and serves updated webpages locally on your workstation.
- Action: In VSCode, ensure that a terminal is open. If a terminal is not open within VSCode, click on the
Terminalpulldown menu and selectNew Terminal.
Click to expand screenshot for this action

- Action: From your shell command prompt, navigate to the root directory of your forked repository and enter the command
hugo server, and hugo will start a web server on your localhost to serve a local build of the repositories webpages, and return a link to the address where you can view the local build.- Observe in the screenshot below, the hugo server started on localhost using port 1313, in your own environment hugo might use a different port, so make sure to use the port number listed in the output of the hugo server command in your environment.
Click to expand screenshot for this action

- Action: Open your web browser to the url for the local hugo server to view a locally built copy of the website for the docs repo. Navigate to the URL of the file you created
- Note: If you review your local copy of the website and find that the updates you made did not come out the way you wanted them to, you can leave the hugo server running while you make updates to the content, each time you save a change to a file hugo will automatically build and serve the updated web page.
Click to expand screenshot for this action

Step 5B - Commit your updates
A git commit is another tool to help prevent merge conflicts and ensure smooth operations. Any time you edit or add a file to a git repository, after you save the file, you then will need to use the git add FILE/DIRECTORY_NAME and git commit commands, and git will save identifiers in version control so that it knows what changes you have made relative to the exact state of the file or repository when you made the change.
- Action: From your shell command prompt, ensure you are in the
/docs_pd6204/content/en/docs/localdevelopment/guestbook/directory and enter the following commands to commit your updates:
# use the "git add" command to add your updated files to the staging area in your local context to mark them as ready for the next commit
## The "." in the "git add ." command indicates git will commit every new or modified file in the current directory and any child directories will be added
git add .
# enter the "git commit -m" command with a descriptive message about the update your are submitting
git commit -m "Adding file to the localdevelopment guestbook directory to complete lab exercise"
Click to expand screenshot for this action

Step 6: Push your new branch to your fork on github.com
Now that you have committed your updates locally, you can push the updates to your forked repository on github. While you will open a pull request to submit your changes to the upstream repository, since you are the owner of your own fork, you are allowed to push updates to your fork. After you push your updates to your fork on github, you can submit a pull request through the browser.
- Action: From your shell command prompt, navigate to the root directory of your forked repository
/docs_pd6204/, entergit branchto confirm your branch name, and then entergit push origin BRANCH_NAMEreplacing BRANCH_NAME with the name of your branch.- Observe: The output of the
git pushcommand provides the exact GitHub URL you will need to go to in your browser to open the pull request to submit your updates to the upstream repo, as shown in the screenshot below.
- Observe: The output of the
Click to expand screenshot for this action

Step 7: Create pull request to submit your proposed changes
- Action: In a browser, navigate to the URL provided in the output of the
git pushcommand in the previous step, and clickCreate pull request.
Click to expand screenshot for this action

- Action: Your browser should automatically redirect to the pull request page on the upstream repo for the pull request you opened in the previous action. Your pull request has now been submitted. At this point you will need to wait for an admin to approve the merge before your updates will be merged into the main repository.
Click to expand screenshot for this action

This completes the exercise
Last modified May 24, 2021: fixing typo (41b7c2b)